1. What hydro dipping is and how it works
Hydro dipping, also known as water transfer printing, is a process of applying printed designs to three-dimensional objects. The hydro dipping process begins with prepping the object to be dipped.
This usually involves sanding away any existing paint or finishes and applying a hydro dipping activator. The hydro dip activator helps the new finish to adhere to the object.
Next, the object is placed in a vat of water that has been mixed with hydro dipping film.
The film contains the design that will be applied to the object.
As the film dissolves in the water, it coats the object.
Once the object is coated with the film, it is removed from the water and allowed to dry. The hydro dipping process can be used to apply a wide variety of designs to a variety of objects, including toys, automotive parts, and firearms.
2. The necessary supplies for hydro dipping
Hydro dipping is a unique customization process that can be used to give nearly any object a one-of-a-kind finish. The process involves dipping an object into a tank of water that has been infused with pigment.
As the object is removed from the water, the pigment adheres to the surface, creating a vibrant and durable design.
Hydro dipping has become increasingly popular in recent years, as it offers an easy way to add personality to everyday items. Although hydro dipping is relatively simple, there are a few necessary supplies that you will need in order to get started.
First, you will need an infusion tank large enough to submerge your object. Some hydro-dipping lovers use the tub to be the container for hydro dipping.
Second, you will need hydro-dipping film in the desired pattern or color. You can choose the designs of hydrographic film from our website: hydrodipprint.com
Finally, you will need an activator solution, which is used to adhere the film to the object. With these supplies on hand, you will be ready to start hydro dipping! The spray gun is a good choice to spray the activator evenly.
2. The different types of materials you can use for hydro dipping
Hydro dipping, also known as water transfer printing, is a process in which hydrographic film is applied to an object to create a three-dimensional design. The film adheres to the surface of the object and is then sealed with a clear coat.
Hydro dipping can be used on a variety of materials, including metal, plastic, glass, ceramic, and wood, etc hard materials even stone.
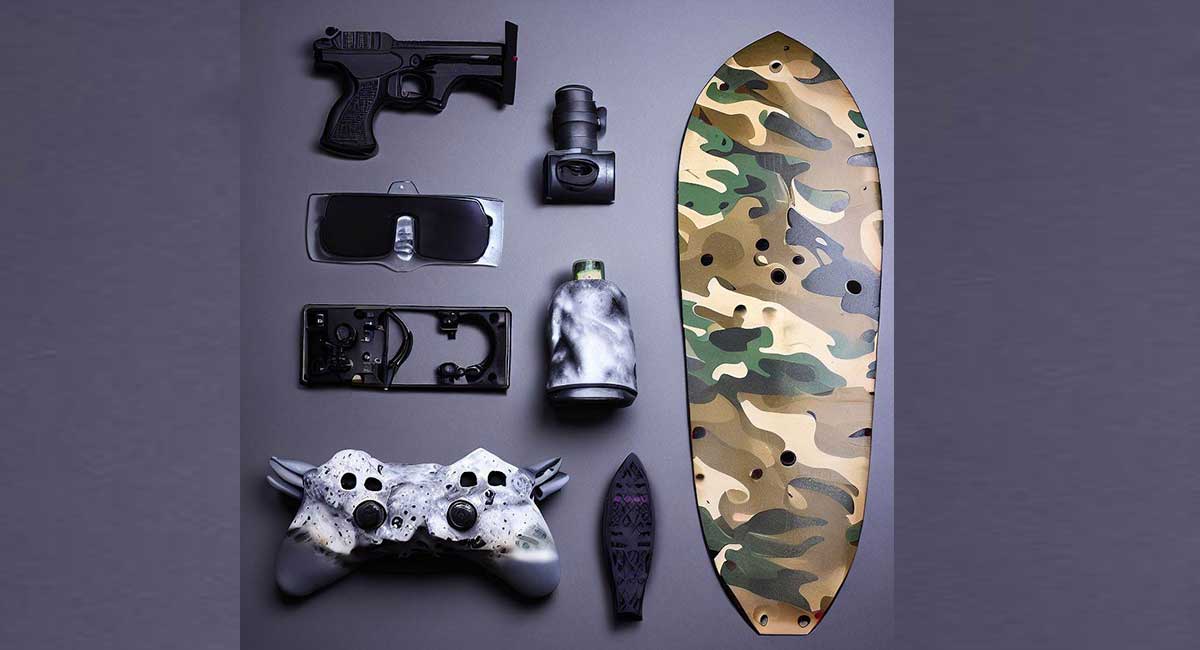
The most common type of hydro dipping is hydro dipping car parts, but the process can also be used to decorate firearms, gaming controllers, and household items. With hydro dipping, the possibilities are endless.
3. How to prepare the material you want to use for hydro dipping
Hydro dipping is a process of applying a design to an object using hydrographic film. The film is transferred to the object using water, and the object is then coated with a clear finish to protect the design. The hydro-dipping process can be used to apply designs to a wide variety of materials, including wood, plastic, metal, and glass.
To prepare an object for hydro dipping, it is first important to clean the surface of the object thoroughly. Any dirt, grease, or other contaminants on the surface of the object will prevent the hydro-dipping film from adhering properly.
Once the surface is clean, it is important to roughen it up slightly so that the hydro-dipping film will have something to grip onto. This can be done by sanding the surface with medium-grit sandpaper.
After the surface has been cleaned and roughed up, it is time to apply the hydro-dipping film. The film must be applied in a water-tight container, such as a plastic tub or container.
The water should be deep enough to completely submerge the object you are hydro dipping. Once the water and film are in the container, you will need to activate the film by submerging it in water for several seconds.
Once the hydro dipping film has been activated, you can begin dipping your object. Slowly lower your object into the water until it is completely submerged. Be careful not to move or disturb the water too much, as this can cause air bubbles to form under the film and ruin your design. wait several minutes for the hydro-dipping film to adhere to your object before removing it from the water.
Once your object has been removed from the water, you will need to apply a clear finish over top of the design to protect it. This can be done with clear spray paint or a two-part epoxy resin. Allow plenty of time for the finish to dry completely before using or handling your hydro-dipped object.
4. Hydro Dipping VS Painting
Applying paint or a coating to an object can be done in a number of ways, but hydro dipping is a method that offers several advantages.
Also known as water transfer printing, hydro dipping involves immersing an object in a tank of water that has been treated with a hydrographic film. As the film dissolves, it transfers the desired pattern or design onto the object.
The hydro-dipping process is relatively simple and can be used to apply a wide variety of patterns and designs onto objects of all shapes and sizes.
In addition, hydro-dipped items often have a more durable finish than those that are painted using other methods.
5. Tips and tricks for getting the best results from hydro dipping
Hydro dipping, also known as water transfer printing, is a process of applying hydrographic film to an object. The film adheres to the object and creates a design that simulates the look of metal, wood, or other materials. Hydro dipping can be used on a variety of objects, including cars, motorcycles, ATVs, firearms, and glassware.
There are a few things you can do to ensure the best results when hydro dipping.
First, be sure to clean the surface of the object you will be hydro dipping. Any dirt, grease, or other residue will prevent the film from adhering properly.
Second, make sure the object is completely dry before hydro dipping. Water droplets can cause the film to wrinkle or tear.
Finally, apply the film Slowly and evenly to avoid bubbles or wrinkles.
With these tips in mind, you’ll be able to create stunning hydro-dipped designs that are sure to turn heads.